Wednesday, June 24, 2009

3rd Time's A Charm


So almost a week and a half of grueling late night work later we have an actual custom joystick together. My brother, John, and I worked on this baby after everyone else had gone to sleep in the wee hours of the night during our stay with them. Their smaller shed(actually tiny house) in their back yard provided us with some sound absorption as we routed into the night. Having an actual work space and the right tools made this task so much easier than I ever thought it would.

The plan was simple to start, shoot for a variation of this box from slagcoin.com. While we were just using the spare wood John had around we did use some MDF for the top panel. I think everything else was a pine, as we came to incur the random dent or two during the process. Considering we had the materials on hand it worked out for the best as I simply wanted a working box. My brother had better ideas and so we went about making it purty by going with miter joints rather than butt joints. Man what a pain in the ass did it become, but the end product made it all worth it. The entire thing was a blast to do and quite the learning experience.

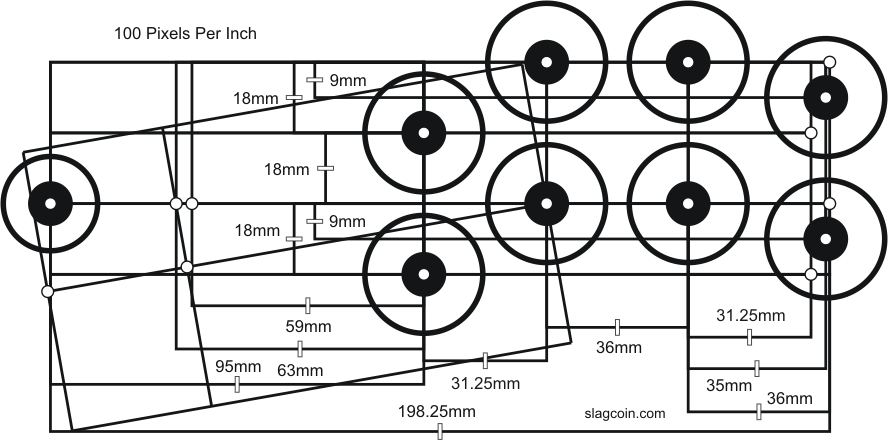
We used the basic dimensions from slagcoin and went with this layout for the top panel. Again big hands need large spaces to rest on. Most of the work was spent on the miter joints and getting the 'puzzle box' to fit together right. We cut the top panel out first and worked around that with the remaining joints. After a few days we came to the realization that our mdf top panel wasn't cut straight here and there....which led to so much fun throughout the project as it affected everything else from then on. We also made the mistake of not cutting out the acrylic and top panel together, so we had loads of fun matching them up later on. We did at least cut the button holes and joystick with the two together, so our initial acrylic cut matched the top panel perfectly(gap problems later). We had all intentions of using this one as a template so we could re cut the acrylic later on as we had a tendency to scratch the stuff easily. Acrylic aside, we went about routing out the joystick hole for the mounting plate.


You'll notice the nice Frankenstein look it ended up with.....apparently when you cut stuff upside down it doesn't quite fit things when they're right side up. Again who knew these kinds of things? We routed down the top and bottom for the mounting plate as well as a spot for the wire harness to fit through on the bottom. We put the top panel aside and began the work of fitting the miter edge puzzle pieces together along with the inside pieces.

An aside here, when I say "we" I really mean John, as he's much more proficient with woodworking than I'll ever be. Mostly I did a piss poor job of supervising, as we didn't think ahead quite a few times throughout. It did make it more entertaining though :).


After a few days of working to get the angles correct we stumbled on the issue of the bottom not fitting. Who knew slants were longer than straight edges? So we ended up with a nice gap to fill later, you can see it clearly from the picture above. While we began fitting the pieces together slowly another revelation hit us, we had fit the PCB in considering the top panel alone and not with the extra wood inside to adjust for the flush acrylic :( . We lost the bottom piece of wood for fit vs stability; after all what good is a stable box that can't hold its guts in? Next came the side buttons, which we couldn't fit in without having to route more into the top panel. Now it was possible to actually remove those buttons if needs be, vs leaving them forever in the wood. Another bit of miscommunication was the start button placement, not along the top with the other 2 but on the side for ease of use. That lead to the ugly cut you see on the left side of the box. Honestly I cared more about function than craftsmanship, though my brother did a damn fine job with these last minute changes and my heckling into the wee hours of the night.

At one point we realized our inside was too low(unable to fit the acrylic top in flush) as the wood we stripped to inset the top panel on was 1/8' short. That led to more stripping and redoing all the insider miter joints to fit with the existing outsides. Our gap in the bottom aside(putty does do wonders) it fit together rather well once we were finished. Routed the side buttons flush, thus they're sunk in nicely so you don't accidentally hit them. The start button is hit the most, reason for it to be on the right side as it feels natural to simply reach over and hit it after a match.

At the last minute before staining we decided to route out a hole for the mic. Yes we could have drilled a small mic jack hole and left it to be done with later. Yes I know that's a huge hole, but hell I just wanted it functional, thus we used the ms headphone and plugged it in and gauged from that. The two holes you see in the bottom(above pic) are for two brad nails we pin hammered in later that held the mic in place.


So feeling we were done we stained away. John did the first coat, a bombay mahogany polyurethane stain. We were down to the wire on time for the trip, so staining and poly at the same time was the quickest out. That and once again materials on hand go a long way. Eight hours later I gave staining a try, which clearly is not my strong suit. At this point I just wanted to get the guts in the thing and see how it played, so I'll take all the credit for the spotty stain job :) . After that had dried John put a coat of poly over it to give it some more shine. Some more hours later for drying and we went to set all the stuff in and give it a whirl. Low and behold another problem, we didn't account for the bolts in the mounting plate and the acrylic. So here we had our stain done and poly and we needed to route down the top panel to drop the stick down to account for the bolts.

Let's just say we used some crazy unorthodox techniques during this process, but we got it done in the end heh. A short router job done.....well our batteries for the lantern ran out and we had to go to wally world and pick up more which was an awesome 40 minute wait in line.......and we went back to putting the guts in. Hahaha, did I mention we were working by latern at night? Ah good stuff heh. Anyways, after all we'd been through I didn't care at all at that point about a pretty wiring job. Some quick butt caps later and here's the inside and final product.


These were all taken once we'd gotten back home. We spent the rest of our time there enjoying family(and getting some actual sleep at night). As you can see, we didn't bother staining the inside, didn't see much point in it really. Once plugged in we played for a few hours that we regretted the next day. I don't think we slept but maybe one good night the entire trip heh. I just got around to cleaning the wiring up the other day, so here's a final version of the guts.


Not as clean as I would have liked, need to pick up some sleeves for all the wires. A huge improvement over the rush job just to play from before at least. I'm going to have to find some polycarbonate sometime as the acrylic plexi isn't very strong and bows in the middle easily. Once I've picked that up I'll re cut the top as well to fix the scratches and gaps. That and finally add feet to the bottom.

You can see the gap in the bottom of the acrylic here. That is actually the first piece we cut to use as a template. We botched every other piece we tried to cut and funny enough ended up with our work template on the top. Few cuts in it and the gap at the bottom(the unaccounted for angle vs straight distance lol). We went ahead and stained the top panel, though we didn't bother trying to make it look nice as art is going to cover that up in the end.

If you've been following this, you'll know those buttons were picked out a long time ago. Clearly they don't fit with this stain. I'll eventually get around to ordering some other colors to match it and the art whatever that ends up being. All in all it's frigging awesome. The weight is perfect, as the only real heavy piece of wood in it is the MDF top panel. Routing out the joystick plate again actually put the height to what it should have been, so that turned out a boon. The mic works flawlessly, to which I've hot glued in the gaps to keep out dust, etc. I'll have to find some flat screws for the polycarbonate once I've picked that up.

To sum up, it was one of the most fun and grueling experiences I've had on a project. Make sure whatever you do that you layout your groundwork on paper and your plan of attack. We ran into a lot of problems simply due to rushing and not enough forethought. Granted we were on a rush time schedule, so that certainly added to our stupid mistakes and not using our noggins. All that aside, for a first time job for the both of us I'm really pleased with the end results. John is going to work up some art sometime for it. When I get the polycarbonate in and fixed I'll re post with the end results. After all this I think I'll be taking a break for a bit before going after the next one. If you have any questions or laughs feel free to leave'm here.

And as always thanks goes out to my wife for enduring this venture, as well as my sister in law for putting up with our late night shenanigans.

Friday, May 29, 2009

2nd Go

Few busy weeks here and there but I must continue so when I actually make a decent stick I can look back at all the anguish and laugh :).

The tool set began to grow for the project in general. I returned the pos $15 weller and picked up a velleman vtss5u at fry's for $20. Not much more cash, but the iron is so much better. I picked up some terminal strips to organize the wires, some bolts that fit the mounting plate well enough and some more 22 awg wire. Still can't find a good crimper that will strip 22 awg - despite them saying 20-22 on them, 22 just slips right through. They sell some decent strippers that you can change the size by nut, it's just not practical if you're working with more than 1 size wire - which isn't the case here so I picked one of those up as well. It'd just be nice to have a crimper/stripper/cutter all in one that actually stripped 22awg.

Here's the crap table I used for work space. Again my impatience was at work here, as my back paid for it later leaning over this shotty table. Speaking from experience now make sure you have a good work space. Consider such things as amount of work space you'll need, comfort levels with your chair and spine and if you have little ones/angry spouses factor in being able to leave the project as is. I found I had to walk away from it at times after a bad solder attempt. That and having little hands trying to help the next day never bodes well for your overall success.

I also picked up a pair of helping hands from radio shack that went a long way. There's a good size magnifying glass on it and alligator clips to hold your work. With a little experience under my belt the solder job was much easier this go around. The 360 retro arcade stick($9@gamestop) was an easier to work with pcb as well with nice holes next to the signals to put the wire through and solder in. It's large enough to not make the work so nerve racking as well. Here's a look at the finished job, which I don't actually mind showing vs the old dc pcb(that was a wreck). The only mistake I made was putting the Y button on the ground vs the signal below it. A quick resolder fixed that problem and I could see in windows the buttons were all functioning well.


Back to the case problem at this point. We took an afternoon and went to a few craft stores as well as wally world to look for a better solution than another shoe box type. There's a lot of briefcase sticks out there as well as tupperware, that's what we kept our eyes out. Having not much luck I found a plywood box at Michael's for $6. For the record I would not suggest using one as the top and bottom panels aren't even a quarter inch thick. Living in an apartment limits my woodworking tools/options, so I settled on the craftbox despite this problem. I also picked up a 24mm and 30mm drillbit for the button holes versus eyeballing it.

With a few print outs from slagcoin.com I chose the panel layout and went to town on this tiny box.
You can see from the pic how well the top held up. After several splits in the base as well for the back, start and guide buttons I settled the pcb in the center and started to layout the strips....to discover once again I'd forgotten something. The strips weren't going to do me any good without anything to screw them down with. Not only that, the base being so thin most any screw I picked up was going to just go right through it and out the other side to have a nice stabbing effect on any surface the case was placed(my legs included). Impatience prevailed again as I cut the wires long enough to lift the case out, thus the terminal strips were put aside for another day.

All pretenses of clean wiring gone, that's basically what it ended up looking like inside. I used a smaller drillbit to put in the hole for the cord and pulled it through. Some hot glue is holding it in place so it doesn't rip out - best I could come up with for this box. I used two smaller bolts through the bottom side to hold the pcb in place. Of course here again I ran into the oh *$@#! I forgot something else. I'd completely forgotten to get the nuts to hold it down. The extras I had from the joystick bolts were too large of course. So the pcb is currently still sitting like this inside, though it's not really moving as the bolts are threaded nicely into those smaller holes in the underside.

At this point I realized I never came up with a solution for the headset port. I've yet to bother with it, as this case like the previous is a temporary solution until I can make/find another. Here's a few snapshots of the finished product sanded down on the sides and edges but left unstained(which was another mistake).

Top view:
The guide and back buttons:
Start button & empty name plate:

And no I didn't remove the name plate from the box. I couldn't decide if I wanted to stick something in there or just remove it.

So with the second attempt finished I'm feeling a lot more confident in my pcb work. I have a long way to go as far as cases, as I've yet to actually build one. The craftbox was a decent start for looking at layouts and understanding spacial limitations within. Staining the wood is a must. Within a day the plywood began absorbing the oil from my hands and has left it nice and ugly to look at where they rest next to the stick and buttons. Again a common sense issue I simply didn't care to remedy. Patience will go a long way in crafting a real box, as the entire project would have benefited from such a simple thing. I also would chose a different panel layout the next time around as there isn't much space to rest my left hand with the stick being so far out from the buttons. Again I would stress triple checking your materials prior to starting.

I'm heading out to Texas next week to visit family....and there's a garage! So I'll keep notes and take pics of what we come up with out there. It should be interesting.

Tuesday, May 19, 2009

Prototype 1

I'm going to use this to as a log for my work. Simply put I'm tired of emailing too many photos to a few to have them simply sent back from their work emails :) . Currently I'm working on building custom joysticks for fighting games. A little background for the rest follows.

For those happening upon this, I'm a full time dad that is clinging on to his youthful pastime of gaming. My 2 and a half year old currently loves playing Street Fighter 4 with me, as well as Pac-Man to her mother's disdain. That's not to say she doesn't enjoy some games with me, she simply has no taste for several genres that I've always been into. FPS, Fighting and RTS to name a few big ones off the top of my head.

That sums up most of it, so back to the reason for this. Lately I've been experiencing some rather alarming pain in my left thumb when playing, specifically on a d-pad. An all niter of SF4 started this current bout, and it's been a thorn since late February. I laid off of it for a week in a splint taking over the counter anti-inflammatory medicines. After a month and a half I visited a hand surgeon who basically gave me some harder prescription stuff and some rather unhelpful advice - basically he'd never run into anyone with these kinds of issues. I'm finishing up the meds and going for a second opinion later this month.

Well with that out of the way, I decided it was best to take matters into my own hands if I wanted to continue ever playing in the fighting genre. I've been a long time reader of Shoryuken.com, I've simply never joined the fighting forum as I've never had any real intentions to become a tourny level player. However, with the revival of the genre as of late I'd been keeping up with the Tech Forum and the custom stick makers had piqued my interest. Instead of waiting around with the rest of the world to plunk down $150 for an official Tourny Ed stick, it seemed I could make one myself for half that price. Thus began the current journey.

I'm an old time SF player, from back when the original hit our small town arcade with the red and blue smash buttons. When SF2 came out, I was a die hard player for life. Ken was my main, and when super came out I was known as "lime green Ken!" by a few of the locals. Glory days aside, I've been playing fighting games ever since. Thus when SF4 came out, my wife(there's not a better one out there) surprised me that afternoon with a copy and an official Ken fightpad.

As much as I appreciated it all, I knew I was going to have to buy a stick to get back into it. After getting into the tech forums on srk however, I decided to build one myself. I grew up on Happ parts as most American players did. With that said, having the old thumb woes I figured it might be time to change to less resistance and learn on a Sanwa stick this go around. A few weeks later(thanks to Ponyboy of SRK) I got my JLF, OBSN-30's and 24's in. Picked up a cheap solder iron(big mistake) from Home Depot and some other misc. tools I was going to need. The case solution eluded me still, as people are charging insane prices or are simply too backed up to even take your order. Then there was the pcb itself, which having never used a solder iron I was reluctant to pick up a cheap madcatz to ruin it out the bat. So instead, I turned to older joysticks and then finally decided on the Dreamcast.

Here's a machine that was way before it's time. Not to mention the fact that all the best fighting games were on it. Soul Caliber, SF3 Third Strike, MvC, MvC2 and the list goes on. So with some help from slagcoin.com(greatest resourse out there) I found the pcb diagram and went to work. It was definitely an experience, with a lot of swearing :) . Having finished it and wanting quick results, I scanned our home for a suitable box to gut. I quickly started some rather stupid guesstimations on placement and ruined the Sennheiser box.


Finger placement was way off, I slowed down and went back to slagcoin and printed up some of the layouts found there. Next up was the old PS2 box. Strangely enough it held up rather well after I was done with it all. It was certainly ghetto, the jlf was held together in there by some old screws put in through the top and held inside by...another sliver of cardboard hah. At that point I didn't care, I just wanted to get it together and see if my solder job was up to snuff.


Yeah I know, I have some huge mitts hah. Here's a quick shot of the insides, the styrafoam actually held the entire thing together nicely. All things considered I was rather pleased that it turned out as well as it did for a first prototype.


It's since been dismantled and chucked to the four winds. My soldering turned out to be shotty on a few buttons, which I went back and redid twice. That taught me how much I really needed a good case that I could open and close to work in, as well as enough space to lay it all out. Man what a pain pulling all that stuff out and back in - you see how large my paws are. A few more tries and I got it all working and put in a few good games of Third Strike. If you're ever thinking about doing this, know you can't do much worse than I. For the most part I ran into a long running list of 'things I still needed'. Quick Disconnects, Butt Caps, 24 gauge wire strippers; it was a long list as the week went by. Quickly my 'make it for half that' project had reached $80 in parts. And this was only the beginning :( .

Things to keep in mind if you give this a go. Sit down and really double check all your parts before you start, then check it all again. Never underestimate how much wire you need, it can always be cut shorter. And lastly, really look for a decent size work space case to start out on - it will make a huge difference in your work as well as your patience.